Saturday, June 19, 2010

Friday Dinner - Cream of Tomato Soup and Ham and Cheese Panini


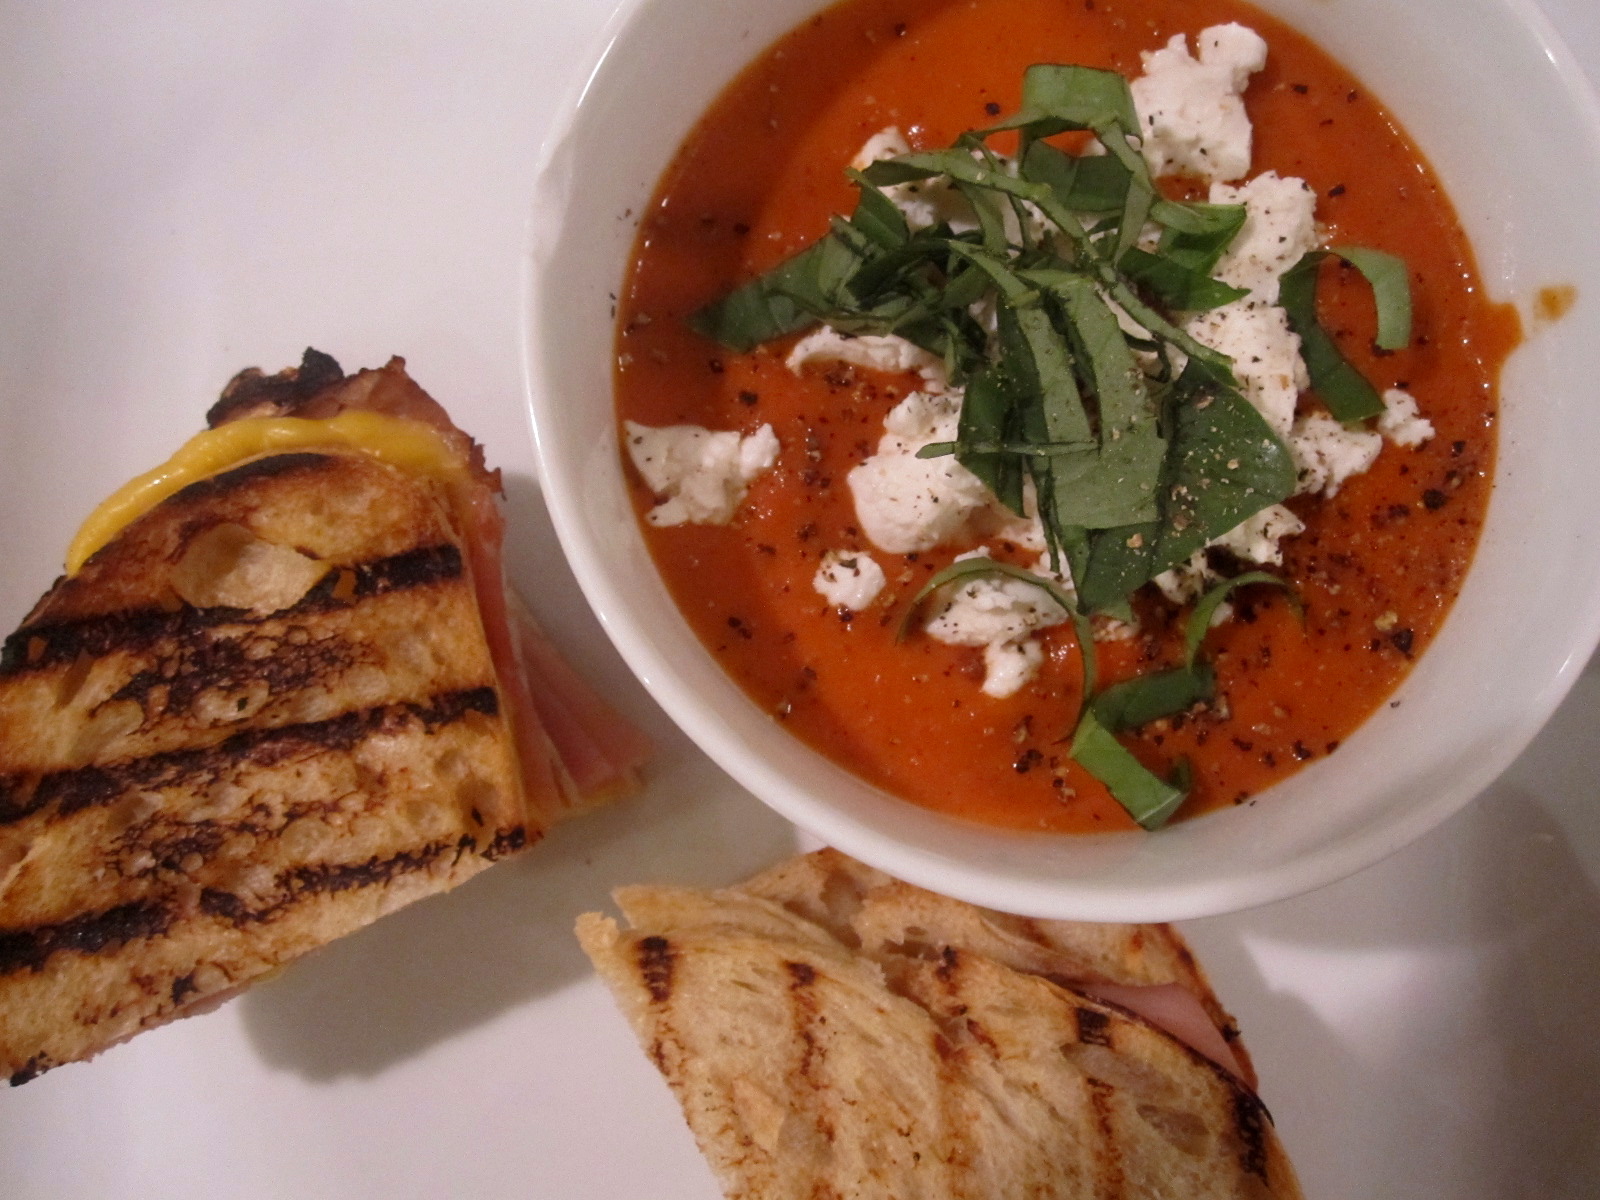
I found this amazing tomato soup recipe on Smitten Kitchen (my favorite). I've always loved tomato soups, but I can't stand the ones that come from a can or a box. I found one soup, it may have been a tomato bisque, at South Congress Cafe in Austin (which is where I also fell in love with goat cheese via their warm goat cheese salad - more on that later). It appears they don't have it on the menu right now but let me tell ya - that soup was the greatest! They garnished it with fresh basil and goat cheese. It was so creamy - and had none of that sugary aftertaste most of the canned and boxed soups have. I've been trying to replicate it for sometime to no avail until I came across this recipe on Smitten Kitchen. It's so very close to the one I fell in love with, I've made it no less than 5 times in the last two months.

Soup and sandwiches is kind of a cliche meal, I suppose, but we have several variations so we switch it up from time to time. In the near future, I'll share our tortellini en brodo (fancy name for tortellinis cooked in chicken broth) and rotisserie chicken sandwich recipe. Another great combo.

A croque monsieur is a delightful sandwich to serve with this meal, but it involves a lot of time so we pared it down to the essentials - ham and cheese, and dijon mustard. The soup and sandwich go so well together, I usually eat most of soup by sopping it up with the sandwich. I recommend it.


Cream of Tomato Soup (from Smitten Kitchen):
2 (28-ounce) cans whole tomatoes packed in juice, drained, 3 cups juice reserved
1 1/2 tablespoons dark brown sugar
4 tablespoons unsalted butter
4 large shallots, minced (about 1/2 cup)
1 tablespoon tomato paste
Pinch ground allspice
2 tablespoon all-purpose flour
1 3/4 cups chicken stock, homemade or canned low-sodium
1/2 cup heavy cream
2 tablespoons brandy or dry sherry
Salt and cayenne pepper

Adjust oven rack to upper-middle position and heat oven to 450°F. Lined rimmed baking sheet with foil. With fingers, carefully open whole tomatoes over strainer set in bowl and push out seeds, allowing juices to fall through strainer into bowl. Spread seeded tomatoes in single layer on foil. Sprinkle evenly with brown sugar. Bake until all liquid has evaporated and tomatoes begin to color, about 30 minutes. Let tomatoes cool slightly, then peel them off foil; transfer to small bowl and set aside.


Heat butter over medium heat in large saucepan until foaming. Add shallots, tomato paste and allspice. Reduce heat to low, cover, and cook, stirring occasionally, until shallots are softened, 7 to 10 minutes. Add flour and cook, stirring constantly, until thoroughly combined, about 30 seconds. Gradually add chicken stock, whisking constantly to combine; stir in reserved tomato juice and roasted tomatoes. Cover, increase heat to medium, and bring to a boil. Reduce heat to low and simmer, stirring occasionally, to blend flavors, about 10 minutes.


Pour mixture through strainer and into medium bowl; rinse out saucepan. Transfer tomatoes and solids in strainer to blender; add 1 cup strained liquid and puree until smooth. Place pureed mixture and remaining strained liquid in saucepan. Add cream and warm over low heat until hot, about 3 minutes. Off heat, stir in brandy and season with salt and cayenne. Serve immediately. (Soup can be refrigerated in an airtight container for up to 2 days. Warm over low heat until hot; do not boil.)


Ham and Cheese Panini: 
Ciabatta bread -or- if you can find it, Pugliese bread, sliced
Deli ham (we used Boar's Head Virginia Ham)
Choice of cheese, sliced (we used gruyere for 2 sandwiches and american for 2 sandwiches)
Dijon mustard

Heat both sides of the bread on a panini grill or saute pan. Spread dijon and mayonnaise on one side and add ham and cheese. Place back on panini grill or pan, close the lid and let the cheese melt about 3 minutes. If you are not using a panini grill, flip the sandwich once while melting the cheese (just like making a grilled cheese). Slice in half and enjoy with cream of tomato soup.


Bon appetit!

Friday, June 18, 2010

Thursday Girl's Night Dinner - Gnocchi with Gorgonzola Sauce


Gnocchi is one of those things (like pumpkin puree) that might just be better if you buy it pre-made. It was fun to make, though, and since Thursday is Girl's Night (Trey has band practice so my bestie Ashley comes over and we cook) it was a good call. Plus, it made for awesome pics if I do say so myself! The ingredients for gnocchi are fairly basic - you might just have all it takes to make them in your pantry. Once you get the dough made, they cook up really quickly and if you are ambitious you can cook as many as you want and freeze them or refrigerate them for up to 48 hours.

There are tons of gnocchi recipes out there, in fact I even learned that not all gnocchi is made from potatoes. You can use semolina flour, buckwheat and even pumpkin! We used a russet potato, but I'd love to try pumpkin gnocchi. Maybe in the fall. There are also several recommended methods for "ricing" the potato. If you have a ricer, I'm sure that would work really well, but we just smashed it. It worked for us!

Once you have the gnocchi down, you get to decide what kind of sauce you want. I found a gorgonzola sauce recipe, and because I am obsessed with all things un-healthy that's what we made. You could also do a nice browned butter and sage or thyme sauce if you want something a little lighter. Just keep in mind the gnocchi in and of itself is not exactly bursting with flavor. You'll definitely want a sauce with some flavor.


Gnocchi with Gorgonzola Sauce:
1 russet potato
Salt
Pepper
About 1 C Flour
1 Egg
3/4 C Heavy Cream
6 oz. Gorgonzola
6 oz. Cream Cheese

There are several ways to cook a potato. You can boil it, bake it or do like we did and nuke it for about 4 or 5 minutes per side. It's faster than the other methods and I'm not so sure the other methods would be any better.

Pierce the potato all over with a fork. Microwave the potato until tender, turning once, about 12 minutes. Cut the potato in half and scoop the flesh into a large bowl; discard the skin. Using a fork, mash the potato well. Mash in the salt and pepper.

At this point you might want to set a large pot with about 6 quarts of water over high heat to boil. 


Move the smashed potato to a large, clean work surface. Form a ball and then punch down a hole in the middle to form a well. Add the flour, the egg and a dash of salt.


Using a fork, stir flour and potatoes, just like making normal pasta. Once egg is mixed in, bring dough together, kneading gently until a ball is formed. Knead gently another 4 minutes until ball is dry to touch.


Roll the dough out into 3/4" dowels. Cut into 1" pieces. Using a fork roll the gnocchi over the tines of the fork to create ridges. Ashley pointed out that the ridge will catch the sauce. Yum!


Drop the gnocchi in the boiling water. As they rise to the top, they are done. Take them out using a slotted spoon and let them drain.

You may want to saute the gnocchi in butter to get them a little crispier. They are pretty soft dumplings and I like the slight crunch sauteing them results in. We made pancetta for the salad last night, so we dropped the gnocchi in the drippings and added a little butter and sauteed over medium-high heat for about 5 minutes.


To make the sauce, put the cream in a small saucepan over medium-low heat and simmer. Once it reaches a simmer, add the cheeses and let them melt. The sauce will get quite thick over the heat, so you may want to take it off while it's still a little thin.


Put the cooked gnocchi in a bowl and cover with the sauce. Top with freshly grated black pepper. Serve warm with green salad (recipe below).

Green Salad with Lemon Vinaigrette:
Arugula or baby Italian mix
Lemon
Olive Oil
Salt
Pepper
! tsp. Grey Poupon mustard
Pancetta
Gorgonzola or goat cheese for topping

This is my all-time favorite salad dressing - I found it while googling Lemon Vinaigrette. It's from Martha Stewart. We make a variation of this salad all the time. Usually we use bacon instead of pancetta, goat cheese instead of gorgonzola and we sometimes add pine nuts. Truly though, the salad dressing is so tasty you could just do lettuce and dressing. 

Dressing:
1 tsp. Dijon Mustard
1 1/2 tsp. lemon zest
2 tbsp. plus 1 1/2 tsp. lemon juice
Coarse salt and freshly ground pepper
6 tbsp. extra virgin olive oil

Combine mustard, lemon zest, lemon juice, salt and pepper in a jar. Add some of the oil and shake until well combined. Continue adding more oil and shaking until all the oil is incorporated and mixture is thickened and uniform in color. Pour over greens.

Cook pancetta or bacon and let drain. Crumble over dressed greens. Add gorgonzola or goat cheese. 


Bon Appetit!

Wednesday, June 16, 2010

Tuesday After Kickball Snack - Steak and Cheddar Bread


Tuesdays are kickball days, so we usually have a light snack before the game (Carnitas tacos from Porque No?) and a light dinner or snack after. Last night, we had this steak in the fridge and I had seen Giada De Laurentiis make this cheddar bread earlier in the day on the new Cooking channel and figured the two would go great together. Cheese and steak? Hell yeah.

Obviously, we had to make the steak the same way we did on Saturday - Tuscan-style. If you want to see that post, click here. The only difference? It was raining out (and really cold, too. Stupid Juneuary) and without propane and considering our less than stellar experience with charcoal we decided to sear the steaks indoors. This method is a great method - we've pretty much got it down to a science. Of course, your cooking time will depend on the thickness of the steak - the thicker, the longer you'll want to keep it in the oven, but for us it's always turned out well. And the addition of the lemon and olive oil after the cooking, mmmmm...So good.

Seared Steak: 
1 steak (we've used all types of steak for this recipe, but last night we used boneless ribeye)
Salt
Pepper
Olive Oil
Lemon

Preheat your oven to 350 degrees.

Salt and pepper your steak generously on both sides. Heat a large heavy-bottomed skillet (it needs to have a NON plastic handle, and be oven safe) to high (like screaming high, as high as your stove top will let you go). As far as skillets go, we LOVE our cast iron skillet and use it for everything, including this recipe. But, any heavy bottomed skillet that distributes heat evenly should work.

Place steak in skillet, no need for oil, it will just smoke. Like, a lot. Sear for 5 minutes. Flip and sear for another 5 minutes. Flip once more. Using oven mitts, or an Ove' Glove, move the skillet into the oven and cook for 3-7 minutes more depending on the thickness of your steak. Ours was about 3/4 inch thick, so I went for 4 minutes in the oven. For a 1 1/2 inch thick steak, go for 5-7 minutes.

Remove from oven, place on cutting board and let rest for at least 5 minutes. Cut into thin slices, drizzle with olive oil and lemon. Serve with lemon wedge on the side.


Cheddar Bread:
8 ounces sharp cheddar cheese, shredded or coarsely grated
6 ounces butter, at room temperature
4 scallions, finely chopped (we used chives)
2 cloves garlic, chopped
Kosher salt and freshly ground black pepper
1 (1 pound) loaf ciabatta bread, cut in half horizontally (we used pre-cut ciabatta bread, and it turned out fine)


Place an oven rack in the center of the oven. Preheat the oven to 400 degrees.

In a food processor, combine cheese, garlic and butter. Process until the mixture is smooth. Add the scallions or chives and pulse until combined. Season with salt and pepper to taste. Spread the cheese mixture on the cut sides of the bread. Place on baking sheet and bake, 10-12 minutes until golden.

If you're using a whole ciabatta loaf, cut into 1-inch thick slices and serve.


Bon appetit!

Monday Dinner - Fajitas


Mmmm...Fajitas. My all-time favorite fajitas are the Cerveza Fajitas from Polvos in Austin. They marinate the beef in beer, for who knows how long, but somehow when you eat them you will be certain it is the best fajita meat you've ever had. They add grilled onions, poblano peppers, guacamole, sour cream, rice and beans in your choice of corn or flour tortilla. I would always get the chili con queso and pour some of that on my fajita before rolling 'er up. Heaven in a tortilla, really. And now I am going to make a plea for someone to please open a Tex-Mex restaurant in Portland. You Portlanders don't know what you're missing. We have fine Mexican food here, but you haven't really eaten until you've had Tex-Mex. I'm more than happy to be a taste tester for you. Anyway, second best will always be my own experimentation, trying to get as close to that food as I can. I have a pretty good queso recipe, but will have to work on it a little more until I figure it out exactly to post it here. 

For these fajitas, we used flank steak. A rather large flank steak. We marinated it in Tecate (2 cans) for about 3 hours - though I'm pretty certain you could get away with marinating it overnight, too.

Fajitas:
1 large flank steak
2 cans Tecate beer (go ahead and get a six-pack. You can drink it while you cook)
Salt
Pepper
Lawry's Seasoning Salt
Cumin powder
Chili powder
1 large white or yellow onion
Red, green, yellow or orange bell peppers
Grated cheddar or cotija cheese
Flour or corn tortillas (we got the freshly made ones from Fred Meyer - they were really really good)
Sour cream
Cilantro
Mexican rice (cooked according to instructions on box)
Refried beans (heated through in a saucepan)

Put the steaks in a Ziploc baggie and cover with 2 cans of beer. Marinate for up to 24 hours, giving it a shake every once in a while to get even coverage.

Put steaks on a platter and season both sides with salt, pepper, Lawry's, cumin powder and chili powder to taste.

Heat your coals or propane grill to high heat. Sear steak on one side for 5-7 minutes. Flip and cook for another 2-3 minutes for rare, 3-5 for medium rare. We don't recommend cooking flank steak any more than medium rare - it's such a thin cut that you can easily over cook it, but if you want medium go ahead and cook for 5-7 minutes on the second side.

Pull it off the heat and let it rest for at least 5 minutes. Cut into thin slices.


Grill onions and bell peppers on medium-high heat for about 5 minutes per side. If the onions look a little burnt, that's good. They're good when they're a little black.

Cut peppers into thin slices. Chop cilantro roughly. Heat your tortillas (wrapped in foil) on the dying embers for about 5 minutes - you just want them warmed through.

On a plate, arrange tortillas and top with beans, rice, steak, onions, peppers, cheese, sour cream and cilantro. Roll up and enjoy!


Buen provecho!

Sunday, June 13, 2010

Saturday Dinner - Grilled Steak Tuscan-Style and Grilled Veggie Pasta


 If you plan on following this blog closely, or not even closely at all you'll find out that I am a HUGE steak eater. Growing up, steak was, more often that not, our Sunday dinner. I pretty much love all steak, however, as I've grown up and my taste buds have matured (as my Mom would say) I am really into nice thick NY steaks or tenderloins. I like them rare. In fact, I eat beef carpaccio whenever it's on the menu so I would even eat my steaks raw.

Last night we tried a recipe from Cook's Illustrated Summer Grilling 2010 issue "Grilling Steak, Tuscan-Style". I'm sure re-posting the recipe here violates all sorts of copyright laws, but until enough people actually read this thing I hope to get away with it. The difference from what we normally do with steak was a drizzle of olive oil and a squeeze of lemon over the grilled steak after it had rested. I was a little skeptical about the lemon especially, but WOW! this was one of the best steaks I had ever eaten, let alone made myself. I beg you to try your next grilled T-bone this way.

A note on grilling, real quick: We are pretty hard core grillers. We grill in the rain, in the snow, in the winter, in the fall, etc. But that's because we were blessed with a super nice propane grill that the owner of our house left us. We recently had to give the grill back to it's rightful owner (no hard feelings, Jennifer) so we broke out the charcoal last night. Propane is SO super easy, we were spoiled. I found out last night that charcoal is not my friend.  We used old charcoal, so that was our first mistake. Use fresh charcoal, people! Next time I want to try the hardwood type but all we had was MatchLight on hand so we used that. Anyway, to make a LONG story somewhat short - it took an hour and a half for the charcoals to get just right and even then I was so antsy and hungry I put the steaks on some really hot coals. It turned out fine, though, so I can't really complain...


Grilled Steak, Tuscan-Style (from Cook's Illustrated):
 2 T-bone or porterhouse steaks, each 1 1/2 inches thick (about 3 1/2 lbs. total), patted dry
2 TSPs kosher salt
1 TSP ground black pepper
3 TBSP extra virgin olive oil
Vegetable oil for cooking grate
Lemon wedges for serving


1. Light large chimney starter filled with charcoal (6 quarts, about 100 briquettes) and burn until charcoal is fully ignited and partially covered with a layer of fine gray ash, about 15 - 20 minutes (or an hour and a half if you are us). Build 2-level fire by stacking two-thirds of coals over half of grill and remaining coals in single layer over other half. Position cooking grate over coals, cover grill and heat grate until hot, about 5 minutes. Scrape grate clean with grill brush. Grill is ready when temperature of stacked coals is medium-hot and that of remaining coals is medium-low.

2. Lightly dip wad of paper towels in vegetable oil; holding wad with tongs, wipe cooking grate. Meanwhile, season each side of the steak with 1/2 tsp salt and 1/4 teaspoon pepper. Cook steaks, uncovered, over hotter side of grill until well browned on each side, about 2 1/2 minutes per side. Move steaks to cooler side of grill and continue cooking, turning once, to desired doneness. For me, this was about 2 minutes per side due to the heat of the coals, but the recipe says 5-6 minutes for rare and 6-7 more medium-rare.

3. Transfer steaks to a cutting board and let rest 5 minutes. Cut strip and tenderloin pieces off bone and slice crosswise about 1/2 inch thick. Arrange slices on a platter and drizzle with olive oil. Serve immediately with lemon wedges.


This pasta is one of our all-time favorite pasta dishes. It's versatile, you can add what ever you want. Sometimes we do it with just the brown butter and mizithra Old Spaghetti Factory-style. Sometimes we add pancetta. Sometimes we add these grilled veggies - and it's my favorite way to make it. Grilled eggplant is one of those things that sounds kind of gross - especially if you're on the fence about eggplant, but trust, it's really good once you cook all the eggplant-y taste out. A good sear is a MUST for the eggplant.


Grilled Veggie Pasta:
Vegetables, we used eggplant, zucchini, red and yellow bell pepper and asparagus
Olive Oil
Salt
Pepper
Angel hair pasta or spaghettini
1/2 C butter
Mizithra cheese, grated

Cut veggies into grill friendly sizes. Spears or rounds work well for the eggplant. Spears work for the zucchini and the bell peppers can just be cut in half after you take out the seeds.

Place in a Ziploc baggie and toss with olive oil, salt and pepper. (Have you noticed I use a lot of Ziploc baggies in this fashion? It's a neat trick.)

Place veggies on a well-oiled grill at about medium heat. These babies all grill for about 5 minutes per side until they are all cooked through and soft and the outside has a nice char on it.

Remove from grill, let cool and chop into bite sized pieces. 


Cook pasta according to the package. Drain and let sit while the veggies cook. When you're ready to eat brown the butter in a small saucepan over medium heat. Watch the butter carefully - once it turns brown it can burn really quickly.


I had wanted to get a picture of the browned butter but I was on grill duty and Trey was on browned butter duty and he is not as into taking pictures of every single thing than I am. One day I'll get one so you can see what it should look like.

Put drained pasta back in the pot you used to cook it and cover with the browned butter and stir. Add some of the mizithra and toss together. Add the grilled veggies and serve immediately.


Bon appetit!